|
|
|||||||||||
| Setting Circles and Polar alignment | |||||||||||
|
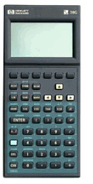
In order to set the coordinates of a celestial object in the T Mount, what I do is this: I have programmed my programmable calculator to compute the correct reading on the RA circle (which is fixed) for a given object at a given time and date. First, you key in the RA of your target, and the date and UT of observation. Then the calculator works out the LOCAL sidereal time and computes the hour angle (all this is pre-programmed). As you will see from your mount, because the RA circle is fixed, the hour angle is in the range 0-12 when the OTA is on one side of the mount and 12-24 when the tube is on the other side. I have programmed my calculator to allow for this, so that the result it displays is the ACTUAL READING for the RA circle. In other words, the calculator tells me which side of the mount to place the OTA. This all sounds very complicated, and it did take quite a long time to write the programme in the first place, but now it is done, setting the circles is the work of a few seconds. Just key in the RA of the target, the date and time, and the RA circle reading is displayed on the screen straight away. I programmed my calculator
about 12 years ago and have not had to alter it since. I just keep
using the same calculator that I programmed back in 1989 - it is my special
'Telementor computer'! You can, of course, take the Dec setting straight
from your list or catalogue with no further calculation necessary.
Polar Alignment Now all this enables us to set up the mount very quickly indeed for an observing session, with a remarkably good polar setting. On the first night, set the mount as carefully as you can using the Scheiner test or equivalent. This will take quite a long time, but it is of course a 'once-and-for-all' operation. Once you have got the elevation of the RA axis correct, clamp it with the large Allen key provided with the telescope. You should hardly ever need to touch it again (I re-adjust mine roughly every 5 years). Now, at the beginning of each observing session, all you need to do is this. Set up the tripod and carefully level it (use the bubble on top of the mount). Now fit the mount on to the tripod pier, pointing it very roughly north (eye estimate will do). Now fit and balance the telescope tube assembly. Choose a bright star not too far from the meridian and at an altitude of approximately 45°, for which you have accurate coordinates for the date of observation (or J2000, if you haven't got more precise figures). Key into your calculator the RA of the star and the date and time (always choose a time about 2 or 3 minutes into the future to allow time to set the telescope!). Set the RA circle to the reading given by your calculator, and also set the Dec circle. Clamp both axes, and unclamp the knob that secures the mount to the pier on top of the tripod. Now look through the telescope with a low power eyepiece while gently rotating the mount on top of the tripod. You should find that the target will eventually come into view. At the precise time that you keyed into your calculator, bring the target to the centre of the field and clamp the mount in position on the tripod. For the rest of your observing session, you should not have to alter the setting of the mount at all. The setting will probably not be perfect, but it will be very good - certainly good enough to use the beautifully accurate, large setting circles to find your targets. I find that with a low power
(x21, x34 or even x53), the circles lead me straight to the star I am searching
for. Usually the target is well within the field of view, though not always
near the centre. If it isn't, a small twist on the RA or sometimes Dec
knob will bring it into view. In this way, I can move from double star
to double star very quickly. Probably it takes me on average about 3 minutes
to find each target, including operating the calculator. It is a very reliable
method and has enormously
2001, Tom Teague
|
|||||||||||