|
|
|||||||||||
|
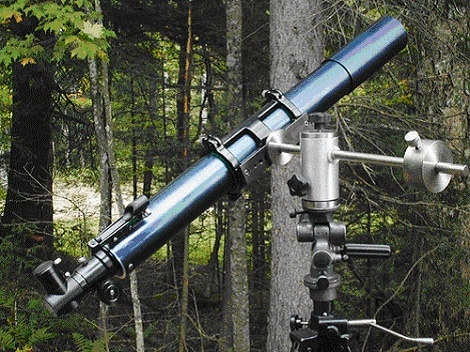
A Compact, Light-weight, Altazimuth Mount
|
|||||||||||
The Need I had just completed building
a quick-look scope - a 63mm f/13.3 refractor built around a very
nice Zeiss achromat lens. The focus of the project was on keeping the scope
light-weight and therefore easy to transport, resulting in a slim 4 lb.
OTA. I now needed a mount that would be a nice match.
The two choices that
I had on hand were both Vixens - a Super Polaris and a Great Polaris DX
and both overkill. What I really needed was a small mount that kept in
step with my light-weight, easy-to-transport mode of thinking when this
project began. Also, the 63mm was intended from the start to be a visual-only
scope, so my choices opened up to include both equatorial and altazimuth
candidates. I had on occasion used smaller mounts of both persuasions before
and found none that I felt were solid enough for a long focus refractor,
even one that only weighed about 4 lbs. I had also built two equatorial
mounts before and from experience found it hard to imagine a design that
would be somewhat compact , light-weight, and still rigid. (I knew that
the Takahashi Teegul would fill the bill, but at nearly $900 it wouldnt
fill my bill.) So, I decided to go with an altazimuth and to continue in
the ATM vein.
The Altazimuth is a simple
mount - with it you need to go up & down and around & around.
Therefore the design is easy and popular. But I wanted mine to be rock-solid
and still light and compact. I based the design literally on a shaft &
ball-bearing platform.
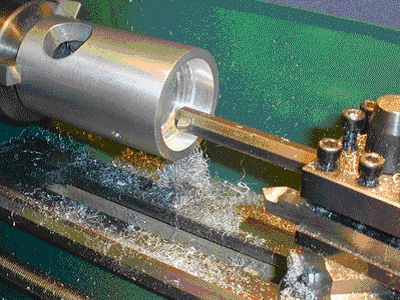
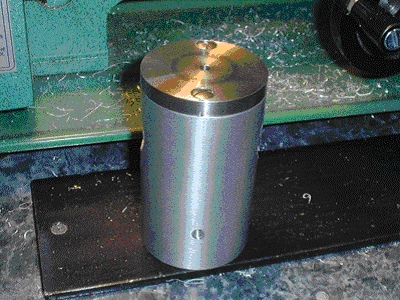
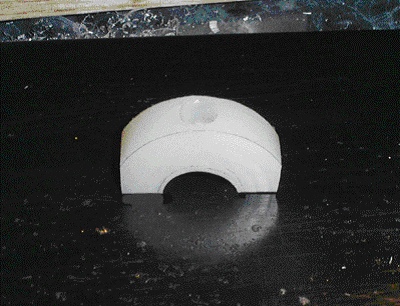
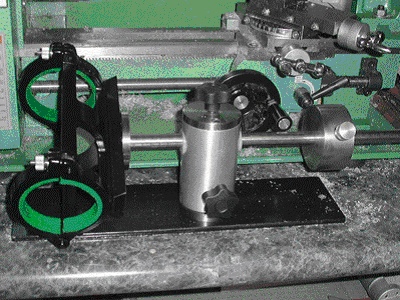
From a 2 1/2 dia. X 2 stainless bar I turned an altitude axis -1 (sized to press-fit the bearing) X 1 3/8, leaving a 3/8 base plate and a 1/4 stop for the inner race of the bearing. The main housing: The main housing is made
from aluminum - 2 1/2 dia. X 4. A 1 1/2 bore was made through the entire
length of the housing and a 2 1/8 bore was made in 7/8 from the bottom
end.
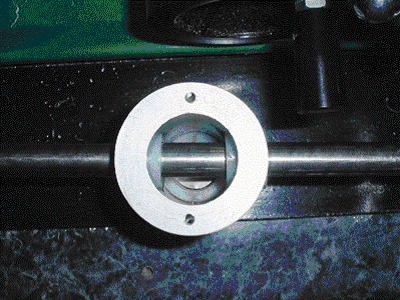
This is to receive the azimuth axis so that when the bearing is seated, the bottom of the main housing rests 1/8 above the base plate. A 1 1/8 hole was bored perpendicularly to the main housing, 1 1/8 from the top, to receive the azimuth bearings and axis. A top lid 2 1/2 dia. X 3/8 was made from stainless with two attachment holes and a center, tapped hole for the altitude-axis clamp knob.
The altitude axis: The altitude axis is a simple
5/8 dia. X 15 stainless rod. A stainless faceplate 2 1/2 dia. X 3/8
was made with a 5/8 (press-fit) bore to receive the altitude axis. This
provides a larger surface for the mounting cradle to ride against. A 1/4
X 20 machine screw was placed in the end of the axis for attachment of
the scope rings.
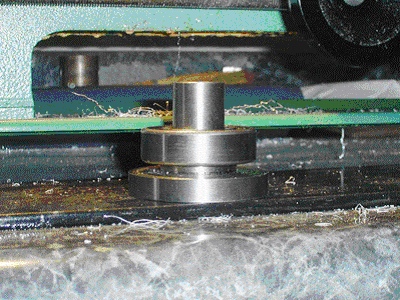
Bearings and clamps: The altitude axis bearings
and axis clamps were made from nylon rod.
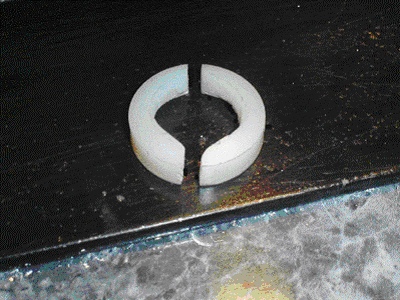
The altitude bearings were pressed into the main housing with Lock-Tight to ensure the stayed in place. The axis clamps were bored then cut in half - two for the azimuth axis and one for the altitude axis. One of the azimuth clamps was affixed to the inside of the main housing with an Allen screw and the other was indented with a 5/16 hole for the azimuth clamp knob to press against.
The singular altitude clamp was indented in the same way for the altitude clamp knob.
Assembly: The roller bearing was pressed
onto the azimuth axis and the nylon altitude axis bearings were pressed
into the main housing. The azimuth axis was then pressed into the main
housing. One of the azimuth nylon clamps was placed between the inside
of the main housing and the azimuth axis and attached from the outside
with an Allen screw. The other azimuth clamp was place on the other side
of the azimuth axis and the azimuth clamp knob was screwed through the
main housing and up against the clamp. The altitude clamp knob was screwed
through the top lid and the altitude clamp was attached to the knob. The
lid was then screwed to the main housing.
The altitude axis was then pushed by hand through the altitude axis nylon bearings and the cradle and weight were added to complete the assembly.
The mount weighs 4 lbs., the cradle weighs 1 1/2 lbs. and the counterweight is 2 1/2 lbs.; bringing the total to 8 lbs. (about the same as a Teegul). And thats the same as the counterweight on each of my Vixen mounts alone. I felt that I accomplished my objective as far as weight is concerned. The operation: The mount was mated to a
Davis Sanford tripod bringing the total weight of tripod, scope and mount
to still less than 20 lbs. The movement of either axis is smooth and remains
stationary when halted. Balance is easy to maintain and the dampening time
of the scope is about 2 1/2 seconds - well within that required for visual
use. With no parts that will rust, it should take the weather well
and provide years of enjoyment.
|
|||||||||||