|
|
|||||||||||
|
A
Customized Telementor. An ATM Project
|
|||||||||||
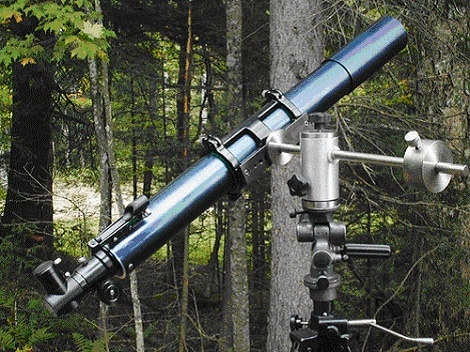
When I visit family or friends, I am often asked to bring along a telescope and show my nephews and nieces the moon and planets. This is always a lot of fun, especially with the little ones. When I do this however, there is one thing that always scares me: "the little ones"!!. The thought of my Telementor crashing to the ground after an enthusiastic nephew got a little too enthusiastic, is the subject of nightmares. I certainly am not going to say "no" to their interest, but at the same time - there is my nerves to consider. After a couple of close calls, I decided that I needed a stand-in. The decision took form when
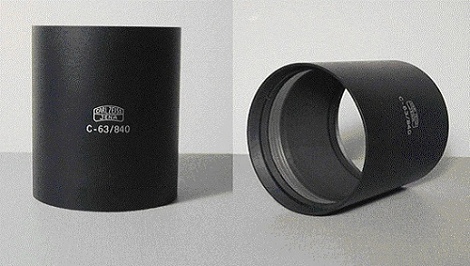
a Zeiss C63/840 lens cell came up for sale on the Internet. It then blossomed
to include the desire for a very light and portable set-up that would be
a pleasure to use and easier for the youngsters to carry (they like to
"help"). The Telementor with it's "two" tube design resulting from the
internal focusing system, made for a hefty little 63mm - weighing in at
7.1 lbs. I wanted to cut that weight by about half, thereby allowing for
a much more light-weight mount and tripod. I purchased the "like-new" cell
and the project was under way.
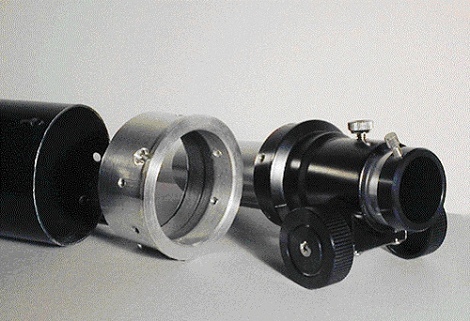
Mounting the cell was the first obstacle. If you have ever taken apart your Telementor ( I like to live dangerously), you noticed that the cell has no adjustments whatsoever. Instead, the end of the lens cell is threaded and is screwed to the end of the internal tube. Alignment then depend on very accurate machining! Machining that Zeiss is known for. However not being a professional
machinist myself, I decided that I would have to do something different.
This process of finding that different something involves starring at
the cell until the idea emerges. I wanted very much to get it right,
so I starred a long time. The idea that emerged is quite simple; find a
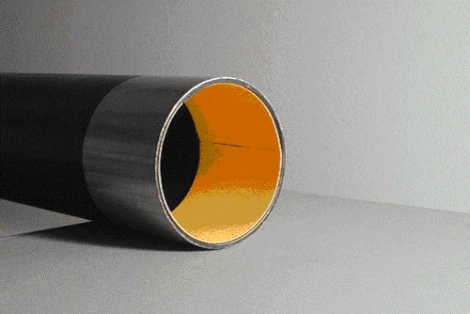
tube that is just slightly larger than the lens cell, shim the first few
inches of the tube so that the cell pushes very snugly into the tube. I
was sure that Zeiss mounted the lenses in to the cell with great precision;
therefore, by using high quality shim material of uniform thickness, I
reasoned, the lens would have to be aligned properly with the tube. From
all I can tell, it works perfectly. I found a high quality aluminum tube
at Sky Watchers in Canada. It measures 72mm I.D.; less than 2mm larger
then the cell itself; which measures 70mm O.D. X 80mm long. I then purchased
.9mm plastic shim stock from www.mcmasters.com
and cut a piece 60mm long by the circumference of the inside of the tube.
I felt that plastic shim stock would be easier on the cell and would allow
the cell to be removed more readily. If the shim is cut accurately (a lion
trimmer helps) it will snap together when put into place inside the tube.
If you have doubts that it
will stay in place, you could glue it in; I chose not to and it seems fine.
The lens cell is then pushed slowly into the shim, leaving about 20mm exposed,
so that it can be grasped for removal. With the shim sized right, the lens
cell will not budge even when the tube is shook forcefully.
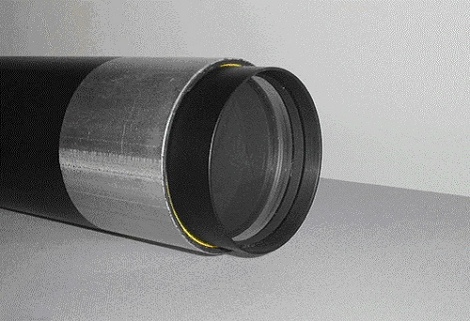
After this "fitting" was complete, I removed the cell and shim to work on the tube itself. I squared and faced the ends of the tube on a lathe (this is critical to getting the focuser aligned properly with the tube). The interior was painted with a very flat black paint and the exterior was painted with a metallic midnight-blue automotive paint. Now for the other end. The
focuser was also purchased from Sky Watchers. It is an 1.25" Antares focuser
that is quite smooth and entirely metal; I felt it was a good bargain.
I then machined an adapter to attach it to the tube. The adapter basically
enlarges the focuser to fit the inside diameter of the tube.
Finally I machined a 200mm length of PVC pipe for the dew shield and placed it 50mm onto the end of the tube, leaving a 130mm of dew protection beyond the lens. A series of three baffles, made from 3/8 thick rigid gasket material, were placed strategically along the inside the tube. After assembly, I added a Tele Vue red-dot finder and star-diagonal and the project was complete. A very enjoyable project overall and quite reasonably priced - the OTA costing approximately $230 US (not counting the diagonal). Optically, I can see no difference between the stand-in and my Telementor. Of course, the Zeiss original is a work of art and built like a tank, but the stand-in weighs half as much and is much easier on my nerves when visiting my family. PJ Anway, 2001
|
|||||||||||