|
|
|||||||||||
| Adapting an after market finderscope to the Telementor | |||||||||||
|
I have had my Telementor for a number of years now, and used it with the attached peep sight arrangement. This worked fine, and in the case of solar observing actually worked very well. In cases where I wanted to star hop however the aforementioned Peep Sight was less than ideal. Recently I read with interest a brief note for P J Anway where he adapted a finder to his tube with a bracket. I decided to do likewise. I located on Astromart a reasonable finder scope, in my case an Orion 6x30. I initially thought I would go the extra bit and get a 7x50 or so, but it made little sense to me to fit a finder with a similar aperture to the main telescope. The Orion was complete with single stalk, 6 point adjustable bracket. And it was cheap. One of my prime concerns
was that the finder was to be mounted without altering physically the original
and pristine optical tube. That way if it didnt look or work as planned
I could remove it without a trace. PJs method using a tube bracket looked
and worked a treat, but I decided to try a different tack. An inspection
of likely places indicated the square, rounded block which fits over
the focuser arrangement was removable. I located, and bent to the same
radius, a similar sized block of aluminium about 6mm thick. I obtained
slightly longer screws and replaced the original screws that held this
fitting and the focuser together. Before screwing this together however
I drilled two further holes to allow the finder to be mounted to the block.
This allowed me to mount the finder to the block and then screw the finder/block
arrangement to the tube.
I trialed this for a couple of successive nights but was not entirely happy. In some instances the finder was directly underneath the OTA, and this was awkward. It also sat off to one side considerably, and radial balance was not possible. There had to be a better way. Boy was I glad I didnt bore any holes in the tube! In catalogues and on a friends
APQ100 I had noticed that the finder when supplied by Zeiss was mounted
to the rear of the OTA via a single "stalk", and that this mount seemed
to fit with the rear screw in fitting of the tube. I had already utilised
this screw in/out fitting for a bracket for a digital camera mount, and
it seemed a good choice following the first exercise. This time around
I again used aluminium, primarily as it is light and easily worked, and
is plenty strong enough. I bored a hole in a piece of plate aluminium,
about 3 or 4mm thick. This hole just the right size to allow the screw
on end fitting to fit over, and when done up retain this plate at the end
of the OTA. I then bent this plate to fit close and along the tube, and
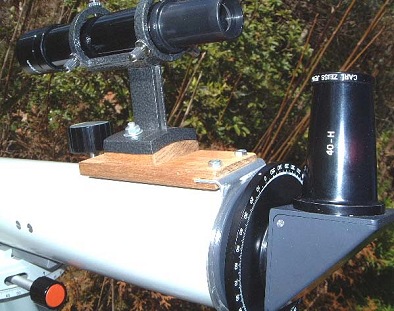
made it about 20 long. I then cut a nice neat piece of timber, in my case
a scrap of teak from a boat building project, but any hardwood will do.
I made this piece of timber sufficiently long to allow me to use the screw
hole that normally secures the rear peep sight, and of sufficient thickness
to bear directly on the tube. I removed the rear peep sight and with a
screw held the front of the piece of wood directly onto the tube proper.
This gave me a screw at the front, and a fitting at the rear, all plenty
strong enough. I then bolted the finder and bracket directly to the wood.
This new design while a little cumbersome looking works well. It balances better, is rigid, and as required has not made any significant alterations to the OTA finish. Now all I have to do is find an original finderscope. If there are any questions please dont hesitate to e-mail me. Gary
Beal, 2001
|
|||||||||||